Cybersecurity has become major focus areas for all the organization and there are many facts which are important for the organization to be ready to handle any threat.
In the 1st module we will talk about Understanding the cybersecurity landscape which will cover:-
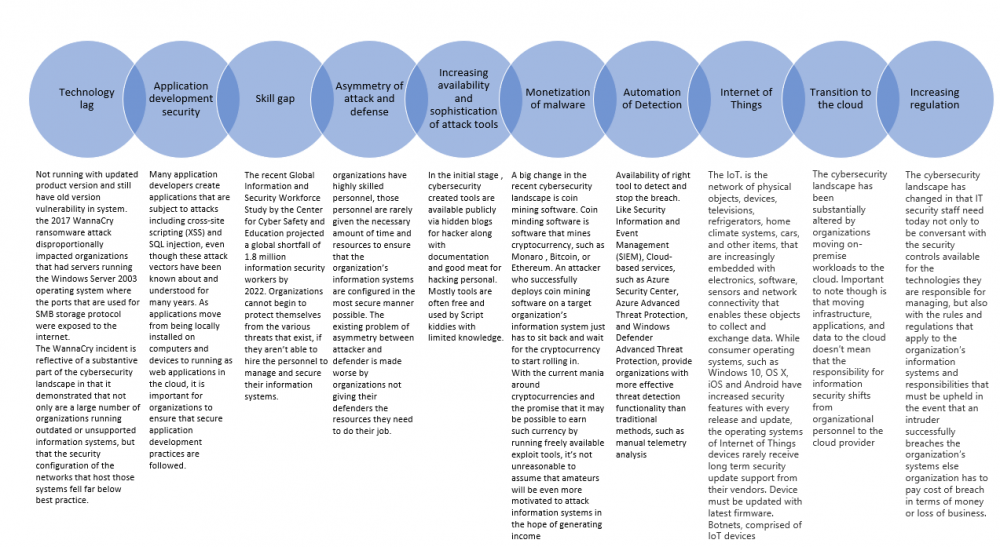
The current cybersecurity landscape
The evolution of attacks
Understanding “Assume Compromise”
Examples of compromises
Evolution of Attacks
Present CyberSecurity Landscape:-
Every day attackers are developing new and ingenious methods of compromising systems. Intrusion tools, originally developed by the intelligence agencies of nation states are available publicly for desired audience. New credential breaches are published on breach notification services, such as haveIbeenpwned.com, every few days.
Vendor are releasing the patch and fixed every month or proactively in order to fix the discovered vulnerabilities. Company are spending huge amount of effort and money to keep the product and system secure but many are the companies are not deploying the latest patches in timely manner and suffer from breaches.
In the current cybersecurity landscape, attackers are finding it simpler to monetize their activities, either by deploying ransomware that encrypts a target’s data and system and demanding payment for a solution, or by deploying coin mining software that generates cryptocurrency using the resources of the target organization’s infrastructure. Making a profit by compromising a target’s infrastructure is becoming easier. This is likely to lead to a more, rather than less, aggressive cybersecurity landscape.
There are, however, several aspects of that landscape to which those interested in the fundamentals of enterprise security should pay attention.
Assume Compromise Philsophy :- T
he assume compromise philosophy takes the position that an organization should build and maintain its security posture based on the idea that the organization’s information systems have already been compromised. Another part of the assume compromise philosophy is that the organization should assume that preventative technologies such as firewalls, anti-virus, and intrusion detection systems (IDS) will fail. Under the assume compromise philosophy, information security teams focus instead on detecting and responding to suspicious activity rather than simply preventing intrusion. Detection of suspicious activity can be assisted by leveraging cloud-based analytics services that constantly monitor information systems telemetry for anomalies.
When you design a security posture with assume compromise in mind, you restrict an attacker’s ability to move laterally between information systems and to restrict their ability to escalate privileges within those systems. These goals can be done by implementing technologies such as Just Enough Administration (JEA) and Just in Time (JIT) administration, segmenting networks, deploying code integrity policies as well as enforcing good administrative practices as restricting administrative sessions so that they can only be initiated from specially configured privileged access workstations.
Example :-
Few attackers compromise an organization without having an objective beyond proving that the organization can be compromised. Attackers target organizations because they wish to accomplish one or more goals. When an organization is compromised, the attackers often do one of the following:
Exfiltrate data - The attackers extract sensitive data from the organization. This data may have been stolen for a variety of reasons, from the theft of commercially sensitive information to exposing organizational secrets to damage the organization’s reputation. Some of the most famous attacks have involved data exfiltration, such as gaining access to a substantial number of customer credit card numbers.
Deploy ransomware;- In ransomware attacks, the attackers encrypt the organization’s data and render the organization’s information systems non-functional. The attackers do this in the hope that the organization will pay a ransom, usually in the form of a cryptocurrency. Once the target organization pays the ransom, the attackers will provide the organization with an unlock key. After inputting this key, the data will be decrypted and the information systems previously rendered non-functional will be returned to full functionality.
Enroll systems in a botnet:- Botnets are collections of computers that can be configured to perform a specific task, such as performing a distributed denial of service attacks. Botnets can be monetized in several ways, including extorting money through the performance of distributed denial of service attacks or used to relay spam (unsolicited commercial email).
Deploy coin mining software:- As of early 2018, coin mining attacks are becoming increasingly prevalent due to their lucrative nature. Coin mining malware deployed in attacks is sophisticated enough only to use some, not all, of the host systems resources, meaning it isn’t always obvious when a system is infected. Coin mining attacks have also been perpetrated by insiders who use their organization’s infrastructure to generate illicit income.
Cost of Breach:-
There is no estimated cost of breach and depends on situation. On top of the disruption to the businesses processes, it is difficult to assess the value of intangibles such as reputational damage, the cost of rehabilitating compromised systems, the cost of investigating the breach itself and the cost of any fines or penalties that may need to be paid to the relevant authority.
Some of the factors that contribute to the cost of a breach include, but are not limited to:

Read Module 2 for how organization should prepare team to ensure security
Thanks with Regards
Amit Kumar Gupta
Certified: CCA-XenApp/XenDesktop/XenServer, Google Cloud Architect, MCSE, ITIL, Vmware Certified , AWS Fundamentals
Microsoft certified - Enterprise Cybersecurity Fundamentals & Planning for Security Incident response.
https://www.linkedin.com/in/amit-gupta-5321a527/
Reference Document from MS.