IT Techy Minds -- We run and explore the IT

Important Tips to Keep your Citrix front NetScaler layer Secured !

Hi Admins

Proteting the IT environment from hackers has been very critical challenge for all the IT Admins and on High Priority.

We will more focus on Citrix NetScaler System protection in this section.

1. Maintain Latest Ciphers: please perform your Citrix website security analysis now in case you have not done. 

https://www.ssllabs.com/ssltest/

TLS 1.0, TLS 1.1 , SSL 2 , SSL3 and some of the TLS 1.2 weak Cipehers should be removed from VIP Ciphers list in order to keep A rating for your website. its important to perform Citrix Client , Browsers analysis before removing Ciphers from VIP Ciphers Group otherwise Handshake will break in case users are using unsupported old browsers or Clients on their machine. (Keep updated).

SECURITY Come 1st and Users should use supported products.

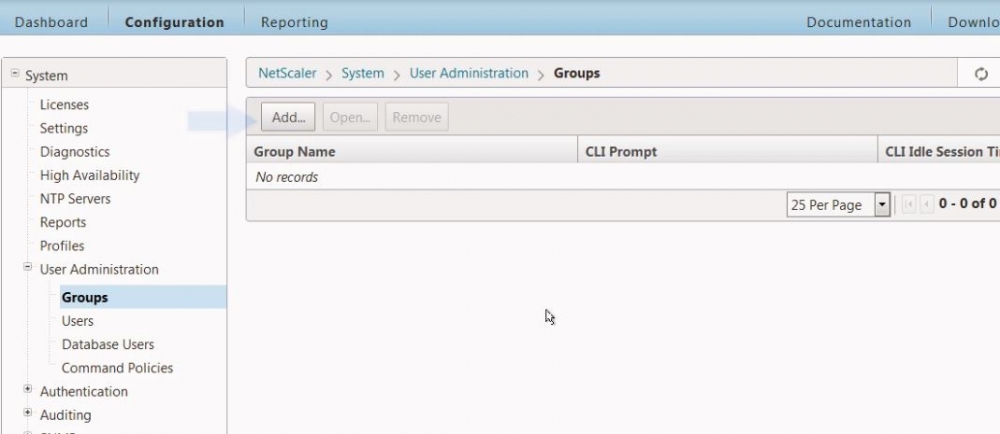
2.  Configure ACL list for NetScaler : its important to strict NetScaler access to all the ports & limit to identified source by using ACL List. even though Mallicious conditates can reach to your netscaler network but cant establish connection by using any port scanner or analyze if you are maintaining ACL list.

3. Perform CIS analysis for NS Devices: its important to perform CIS analysis report for NS device and fillup the GAPS as per vendor recommednation.

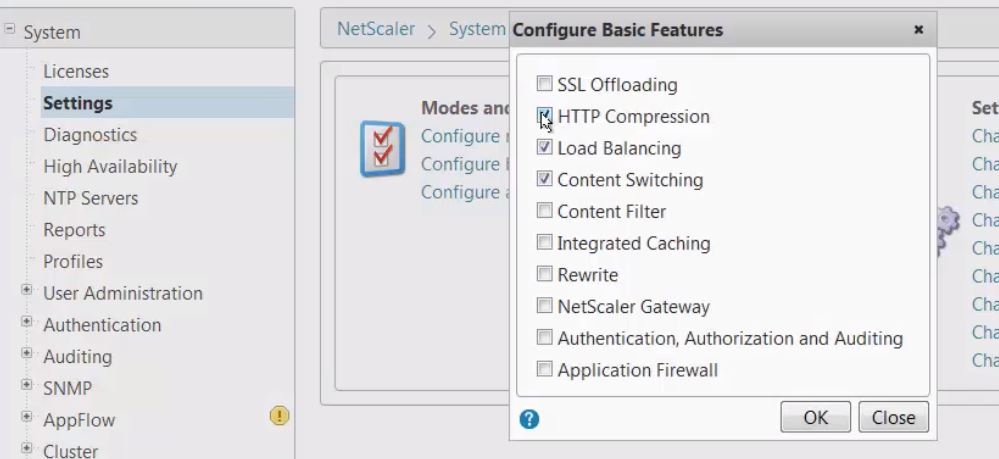
4. Configure APPFLOW:- configure the APPFLOW logs collection and analysis in case you are using Syslog Server or any other analysis tool.

5. Upgrade firmware ontime: Citrix Vendor is too much active in identifying the GAPS and filling up them with new firmware versions & more new features so upgrade the NS firmware ontime.

6. Citrix NMAS: its beneficial to use Citrix NMAS integration with NS devices to analyze all the security attacks and get 365 Degree reports for your NS envrionment. lots of automation and better control over NS devices.

Remember Single Loop hole is enough to destroy the environment.

Some Good links from other blogers: https://neil.spellings.net/2014/01/12/penetration-testing-tips-netscaler/

https://docs.citrix.com/en-us/netscaler/12/application-firewall/security-checks-overview.html


Amit Kumar Gupta

Certified: CCA-XenApp/XenDesktop/XenServer, Google Cloud Architect, MCSE, ITIL, Vmware Certified , AWS Fundamentals. AWS Pratitioner

Microsoft certified - Enterprise Cybersecurity Fundamentals & Planning for Security Incident response.

https://www.linkedin.com/in/amit-gupta-5321a527/


Customize the NetScaler Themes and reflects your brands to users

Hi Admin

its very common now a days that each company wants to reflects their brand names within their apps or websites.

Why not do this when on Citrix gateway access websites.  another marketing stunts and flow the company theme for corportate users or partners who access to it accross the worlds.

Here are some very good known articles on this along with demo.

Video Link:-

https://www.youtube.com/watch?v=6WFu0mUCaHo

https://docs.citrix.com/en-us/netscaler-gateway/12/vpn-user-config/custom-portal.html

Some Good links:

https://www.jgspiers.com/customizing-gui-themes-citrix-netscaler-11/

How to Customize NetScaler Gateway Logon Page for Various NetScaler Versions:- 

https://support.citrix.com/article/CTX126206

There are many more you can do if you are web developers. please take backup before making any changes.


Amit Kumar Gupta

Certified: CCA-XenApp/XenDesktop/XenServer, Google Cloud Architect, MCSE, ITIL, Vmware Certified , AWS Fundamentals. AWS Pratitioner

Microsoft certified - Enterprise Cybersecurity Fundamentals & Planning for Security Incident response.

https://www.linkedin.com/in/amit-gupta-5321a527/


NetScaler Part 5- Advanced Load balancing Techniques

Hi Citrix Administrators

In this section, we will learn about Advanced load balancing concepts which include.

1. BackUP Vserver and URL Redirections

2. Compression

3. Global Server load balancing (GSLB)


BackUP Vserver and URL Redirections:- There are two techniques through which NS load balanced services can failover to another VIP or URL based on the event.

URL Redirection:- The site or services URL will be redirected to secondary URL in case primary URL hosted VServer fails.

Backup VServer:- The backup server load balancing will allow redirecting the user request to another existing VIP in case of down or overload.

The backup Vserver will take more priority if you have both configured.

Steps to create backup Server is quite simple like creating VIP and adding members to series.

undefined
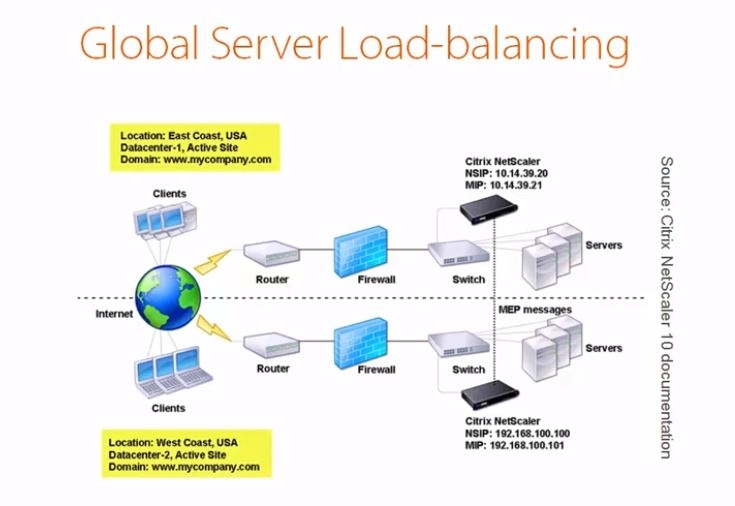
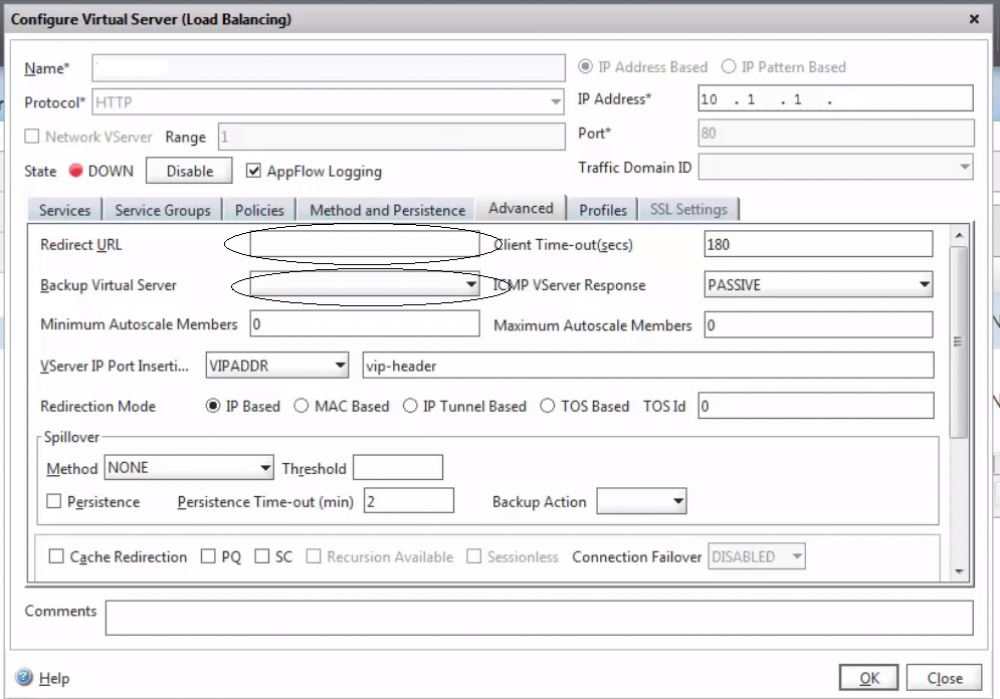
we can define the URL redirection or backup server to handle the production VIP failover or load mgmt.

Compression:- Compression helps in reducing the size of the packet to process further.

There are 2 Major factors for using compression:-

1. Reduced the load on backend Servers

2. Conserves Bandwidth

There are multiple types of content which can be compressed:- 

HTML, XML, CSS, MS Excel, word, powerpoint, plain and Rich text.

There will be no compression happen on already compressed data like.JPG and others. compression is policy based and can be deployed on Vserver or Globally.

Compression is dependent on Browser used by client machine and what kind of compression is supported.

GZIP or Deflate - GZIP and Deflate has the same algorithm and depends on browser compatibility. deflate is little fast compression techniques in comparison to GZIP.

By default, compression is disabled on NS so you need to enable it 1st to use it.

undefined

How to change the compression Quantum size-

undefined 

 How to enable compression on existing VServer:-

undefined

How to Create Policy:- The policies can be created from the policy option in HTTP Compression.

undefined

We will publish another blog about types of policy as its different deep topic.

Global site load Balancing:- GSLB works as Distributing of incoming Traffic between geographical regions hosting the same application through VServers. it uses the same load balancing method as described in previous blogs.

undefined

The GSLB work on DNS query and client IP Range. one of the Netscaler take the role of Authoritative DNS server 

Example - one client is trying to connect to GSLB based site and query reaches to one of the Authoritative NEtscaler DNS which decides redirect the incoming connection to proper NEtScaler VIP which are region wise close to Client IP range.

There are different types of GSLB topology. please refer to Citrix docs for more details which explains in more deep.

1. Active-Active Site Deployment - https://docs.citrix.com/en-us/netscaler/11-1/gslb/gslb-deployment-types/active-active-site-deployment.html

2. Active-Passive Site Deployment - https://docs.citrix.com/en-us/netscaler/11-1/gslb/gslb-deployment-types/active-passive-site-deployment.html

3. Parent-Child Topology Deployment using the MEP Protocol- https://docs.citrix.com/en-us/netscaler/11-1/gslb/gslb-deployment-types/parent-child-topology-deployment.html

In Next blog , we will read with how to configure SSL offload and NS Citrix Access Gateway.

Thanks with Regards

Amit Kumar Gupta

CCA in XenApp/XenDesktop/XenServer,Google Cloud Architect, MCSE, ITIL, Vmware Certified

Microsoft certified - Planning for Security Incident response.

https://www.linkedin.com/in/amit-kumar-gupta-5321a527/


NetScaler Part 4- Configure Load Balancing and its settings

Hello,

In this section, we will learn how to configure load balancing in NetScaler for Web Services and other balancing methods.

To configure load balancing for Web Servers, we need to have 2 Web Server which will be load balanced on NetScaler.

Method of Load Balancing 

1. Least Connection;- This is default method Netscaler uses in load balancing and maintain the equal number of Active connections on backend servers. it works with TCP, HTTP, and HTTPS protocols. 

2. Round robin:- It method send the connection in sequential order, in case of 4 WebServer.

1st incoming connection = Goto Web Server 1

2nd incoming connection = Goto Web Server 2

3rd incoming connection = Goto Web Server 3

4th incoming connection = Goto Web Server 4

5th incoming connection = Goto Web Server 1 and carry on in sequence.

it works on the same protocol as Least connection but not more efficient in load balancing as it does not take into account of backend Active connections.

3. Least Response time Method (LRTM):- It sends the incoming connection to backend Server which response quickly back to Netscaler. it only works with HTTP and HTTPs. this method is more efficient if you have slow and fast response server in the pool and want to have most connection to fast working Servers.

4. Hashing method:- it more efficient method of load balancing as Client request get backend server hash attached and every time any request is made from the same client in particular time window and will always connection back to same backend Server. the connections are distributed randomly in this method.

5. Least Bandwidth:- in this method, NetScaler sense the bandwidth connectivity for backend Servers and send the inputs connection accordingly to most bandwidth backend Server 1st.

6. Least Packets:- it works on the number of packets 

7. Custom:- in this method, Netscaler gather the backend Server information via SNMP Trap and send the connection to better performance Server (based on memory, CPU or etc).


Step to configure load balancing:-

1. Please ensure Load balancing feature is enabled. 

undefined

2. Select both and click ok

3. Create Service 

undefined

Create Service for all the backend web Server

Web Server T-1 - 192.168.1.2

Web Server T-2 - 192.168.1.3


Web Server T-3 - 192.168.1.4

Web Server T-4 - 192.168.1.5

4. Create Virtual Server which will receive the incoming connection and forward the traffic to backend Servers.

WebServer-LB 192.168.1.10, port 80 and HTTP protocol 

Click ADD Virtual Server --> Goto Services tab --> Select all the 4 available Services there.

5. Goto Method and connection Tab -

6. Select the connection method based on requirement.

7. Click Create and Save the configuration

LB VIP is Created now. Test the website load balancing by browsing the IP 192.168.1.10 over the browser and the traffic will be LB based on defined methods.


Persistence Type:- there are many persistence methods in NS and important for a web application where the requirement is to connect to the same Server where the 1st session was established for particular client.

Method Type :-

Destination IP:- It maintains the table and all the connection from this client will go to previous backend Server

SSL Session ID:- Not more used as different-2 browser uses a different method of SSL ID and can cause problem in NS 

HTTP Cookie: The Cookie is added to each request and sends to client browser so next time incoming request are checked based on Cookie received and connect to same previous backend Server

Source IP: when client ip is used to decide the backend Server connection and confusing in case of NAtting or proxy environment where all the client requests are reflecting one IP Address.

URL Passive:- The URL details are coming with incoming connection and connect to matching URL backend Server.

User-defined rules:- it depends on what value is defined in the configuration, browser version, name, cookie value ..etc.

Persistence types are protocol dependent and some methods are time limited.

Select the Persistence Type based on requirements.

undefined

 Thanks for reading the content .


Amit Kumar Gupta

CCA in XenApp/XenDesktop/XenServer,Google Cloud Architect, MCSE, ITIL, Vmware Certified

Microsoft certified - Planning for Security Incident response.

https://www.linkedin.com/in/amit-kumar-gupta-5321a527/ 


Start Learning Citrix NetScaler - Part 3- Setting up NetScaler

Hi Citrix Admins

We will not talk about how to setup Netscaler, Licensing and High Availability

Please download the Netscaler VPX from Citrix website.  

https://www.citrix.com/lp/try/netscaler-vpx-platinum.html?utm_campaign=WWWB0511NSTRDIYDR&utm_medium=Paid+Search+(SEM)&utm_source=sem-net-adc-em-en-sea-go&utm_term=Brand&utm_content=ns-do&ctm_programid=wwwb0511nstrdiydr&gclid=CjwKCAjw-dXaBRAEEiwAbwCi5tZ3OQHyD31vNggbt-jerIsQFwhq-wV2qSqT6cnwsTq0V9cgajCAhBoCpfQQAvD_BwE#/email

Link can change in future so search on google download Citrix Netscaler VPX and will get the 1st link for download from citrix.com

The demo download will work 90 days with platinum trail license which will enable all the features and will fit for your lab testing.

Its 1st step to configure the NSIP in order to access the NetScaler GUI interface and further setting up SNIP or MIP , Root password and NTP.

undefined

As we import the VPX appliance in Vsphere Vcenter and boot up, it will ask for mgmt ip address for Ns instance.

NetScaler 1 - 10.2.1.11

NetMasK- 255.255.255.0

Gateway: 10.2.1.1

Another instance 

NetScaler 2 : 10.2.1.12

NetMasK- 255.255.255.0

Gateway: 10.2.1.1

undefined

 once done with ip --> proceed to save the configuration.

undefined

 Select option 4 and Ns configuration will start automatically. o

 Browse the IP 10.2.1.11 and 10.2.1.12 from browser or telnet via putty depends on how you want to configure and work .

Login with default details nsroot and nsroot

undefined

post login it will ask for Subnet ip details.

 undefined

it best advisable to change the password from default and select time zone.

Perform the same on another NetScaler node. we will move to configuration section to perform the further operation but it will through back to the initial screen because we have not deployed licenses on NS devices.

But there is way out. Click on the right top on Skip button to reach configuration section.

undefined

if you have many team member working on NS then set up groups and users for different types of access to team members.

Create Groups --> set type of access (operator, read-only, Network or Superuser )

Create User and make the member of Groups accordingly.

as last setup NTP details.

undefined


Setting up NetScaler License:- to set up license file we need to login to Citrix.com and generate license file corresponding to NS appliance MAC address.

The file should be available on Ns at boot time so it can read it during boot time otherwise it will consider it un licensed.

undefined

Use this machine id in the Citrix portal for generating the license.

https://support.citrix.com/article/CTX130498 

https://support.citrix.com/article/CTX133147

Deploy the license files and reboot the appliance (this should be performed on both NS devices).

undefined


Setting up NS HA or Clustering:- it important that both nodes should be running the same build and version to achieve this.

HA and clustering are two different stuff.

For clustering - We would need a separate license and work in Active-Active mode. (both nodes share the load)

There can be minimum 2 and max 32 devices in cluster mode. all the configuration will replicate except SNIP or MIP 

There are 2 methods to configure the Snip / Mip in the cluster called Stripped and Spotted 

Stripped:- all the Ns share the same SNIP (Citrix don't recommend it as it created the problem with ARP as )

Spotted:- All the Ns has different SNIP and recommended by Citrix.

NetScaler HA:-

Its available with All the version and work in the Active-Passive method. (passive nodes become active in case of active node failure)

1. All the NetScaler configuration is synced to the secondary node.

2. Hart beats every 200ms over UPD 3003 port

3. Both node sync 3010 and 3008 ports

4. Command propagation 3008, 3011 ports

5. file Sync TCP / 22

Configure HA is quite simple

1. Login to any of the NetScaler with nsroot --> system configuration--> High Availability

both Ns will show node as primary so not to worrry.

Click on Add button -->

undefined

Enter theIPp of another node and nsroot & password.

undefined

that's All. sync will take place for some time and primary node configuration will replace to secondary.

force sync operation can be performed from Action option in window according to need.

Thanks for reading the article and keep visiting.

Thanks

Amit Kumar Gupta

CCA in XenApp/XenDesktop/XenServer,Google Cloud Architect, MCSE, ITIL, Vmware Certified

Microsoft certified - Planning for Security Incident response.

https://www.linkedin.com/in/amit-kumar-gupta-5321a527/ 

Start Learning Citrix NetScaler - Part 2- Introduction Topology

Hello Visitors

As we have the better understanding on Basic stuff and time to learn about kind of network topology can be used with NS Solutions.


 undefined

1. Physical:-  its depends on network interface connected to NetScale.

One ARM: - it uses the one network interface to connect to client and Server. it has more dependency on one network interface and can cause traffic chock up depends on network connection speed settings.

 undefined

Two Arm:- 2 network interfaces are used to handle the connection.

1 network interface connects to the client and another interface connects to backend Servers. netscaler is placed between both interface connectivity. its also called as inline topology.

undefined

so the decision can be made between one arm and two arm based on below factors.

1. Number of the interface on NS

2. is your company policy allowed to NetScaler network to expose backend Server network and internet facing network ?

3. Two arm is more secured and used one.

4. Two arm provide more bandwidth as a separate network for both network 

5. One ARM is one network bandwidth limitation.


Logical:-  

Single Subnet:- Here VIP and SNIP or MIP are from the same subnet if the client can connect to VIP then it can directly connect to backend Server if there are no additional firewall rules in the middle.

Below is an example of one arm Single Subnet Topology;

undefined

Two Arm - Single Subnet Topology - In this VIP is not used and netscaler plays a bridge role between Client and backend Server for connectivity.

undefined

Multi-Subnet Topology:-

One Arm-Multi Subnet Topology:-

One network card is connecting to multiple subnets. Clients are connecting to VIP and SNIP is connecting to backend Server but both are from the different network and did not expose the backend Server network to client network.

undefined

Two Arm - Multi Subnet Topology:- its mostly used Topology and more secure from the compliance point of view.

The different network interface for client and backend server connections same as two ARM but with different subnets for both interfaces.

undefined


So it's up to your environment and ip network design to choose which topology best fit for your organization.

Thanks

Amit Kumar Gupta

CCA in XenApp/XenDesktop/XenServer,Google Cloud Architect, MCSE, ITIL, Vmware Certified.

https://www.linkedin.com/in/amit-kumar-gupta-5321a527/


Home ← Older posts